

In the Gothic spirit of this month's KitBuilders, we're going to build and paint the Billiken Phantom of the Opera kit. We'll also spend a little time on the phantom base and a back wall for the completed diorama. The good news about the Phantom kit is that it has become somewhat more available in the last year. For awhile there the kit became very scarce and the price got as high as $225 ... OUCH! However, since the discontinuation of the Horizon Phantom a few more Billiken Phantoms have made their way to the states. As a matter of fact, we've got a couple at XO Facto going for $139.99 still a bit costly for a vinyl kit, but hey, it's a Billiken, and it's one of their best. In my opinion the only other Phantom kit that comes close to the Billiken is the Delaney version (still available through M.I.M.)
There's something almost self indulgent about building Billiken kits, like opening and savoring a really expensive bottle of wine which you really should have left on the shelf to become more valuable. The next time you do a Billiken kit, take a big whiff right after you've torn open the plastic bag containing the pieces. For me, that smell is right out of childhood. It's the same smell a lot of my toys had when I was growing up and for a moment there, that Billiken kit helps me forget about income tax, car payments, deadlines and all the other chains of adulthood.
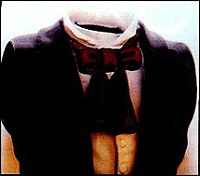
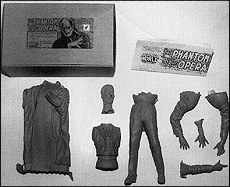 The Billiken Phantom (Ills.# 1), like the Horizon Phantom, can be built
two ways, either with the cape or without. We're going to build the kit
with the cape, the more dramatic of the two choices. Begin by washing
all the pieces in warm soapy water to remove any residual mold release.
Next, use a blow dryer to heat the parts and an Xacto knife to remove
the extra flash. Then, pour plaster of Paris in the legs. You can
probably use one of those foam fillers but when you put that cape on,
the kit becomes top-heavy and that's not good. The plaster of Paris
will help weigh the kit down. Once this is done, go ahead and prime
the kit with your favorite vinyl friendly primer. I usually use Floquil
light gray, unfortunately I had run out (and so had the local hobby
shops) when I started this article and was forced to use white and black. I started with
white on the hands, head and shirt areas. The black would come in later.
The Billiken Phantom (Ills.# 1), like the Horizon Phantom, can be built
two ways, either with the cape or without. We're going to build the kit
with the cape, the more dramatic of the two choices. Begin by washing
all the pieces in warm soapy water to remove any residual mold release.
Next, use a blow dryer to heat the parts and an Xacto knife to remove
the extra flash. Then, pour plaster of Paris in the legs. You can
probably use one of those foam fillers but when you put that cape on,
the kit becomes top-heavy and that's not good. The plaster of Paris
will help weigh the kit down. Once this is done, go ahead and prime
the kit with your favorite vinyl friendly primer. I usually use Floquil
light gray, unfortunately I had run out (and so had the local hobby
shops) when I started this article and was forced to use white and black. I started with
white on the hands, head and shirt areas. The black would come in later.
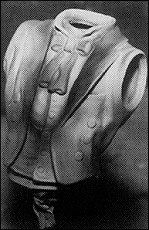
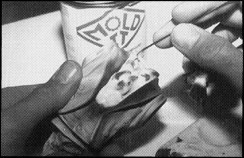
When you do a kit, it's best to come up with a painting plan. A good rule of thumb for this is to go from lightest to darkest. It's always easier to put black over yellow than vice-versa. With this in mind I began air brushing the shirt areas of the kit with Ceramcoat white. Then I punched in the areas that would be shadowed by the suit jacket with Ceramcoat charcoal, being sure to touch up the highlights with more white (ills.. #2 & #3). I use Mold It Rubber and apply it with an old airbrush needle in order to get as smooth a line as possible. You'll apply the rubber to the shirt and both sleeves.

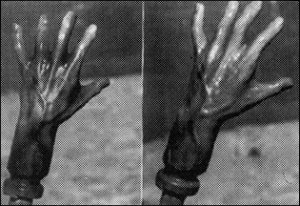
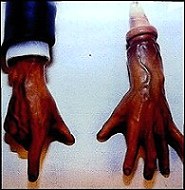
Since we're moving from light to dark and since the right hand is attached to the right arm, we're going to paint the hands before moving on to the rest of the suit and cape. To paint the hands, you'll follow the same painting scheme used for the face, which we'll get to in a couple of paragraphs. One neat trick to use on hands is a technique for bringing out the veins and arteries that show through the flesh. Once you're happy with the overall color tones of the hands use a dark blue (I'm using Polytranspar Sailfish Blue) and airbrush in the lines of the veins. Do this with your compressor set to a very low pressure and with your needle only allowing a small amount of paint to pass through the brush. Hold the airbrush very close to the part and make quick strokes along the vein lines. This may take some practice but with a little diligence, you'll get it down. Next, dull the veins with the same color scheme you used to create the colors of the hands in the first place (ills. #5) Again, protect your work with a dull coat. By the way, I've never had any trouble with any of the dull coats affecting the Mold It Rubber and hurting the paint. Mold It creates a thick enough block to protect the paint underneath completely.
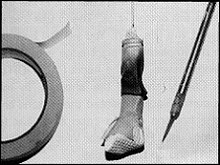
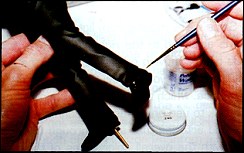
Now that the right hand is painted, you'll want to protect it before spraying on the black primer for the jacket sleeve. Do this by wrapping the hand in a small amount of paper towel and connecting it to the rubber on the sleeve with masking tape (Ills. #6). Again, wait about eight hours before actually painting the pieces, this will allow the primer to completely dry (I know the instructions on the can say you should wait 24 hours but eight is usually enough). With the primer dry I spray all the pieces with a couple of coats of Ceramcoat Black followed up with Floquil Figure Flat. For the inside of the cape I used dark purple.
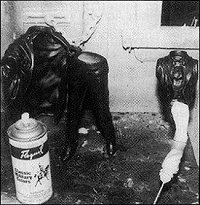
Now it's time to remove the Mold It Rubber. Slowly peal it off, being careful not to scratch the paint on the jacket (Ills. #8) Although the rubber will leave a fairly smooth line, you will probably still have to clean up some of the residual paint flakes. I do this by taking a Q-tip and cutting it in half to create a sharp edge on the cotton stick. Then I use that edge to clean up the paint line (Ills. #9). You will still have to go back and paint in a completely straight edge around all the lines of the shirt and sleeves. For the Ascot (Ills. # 10) I used Ceramcoat Black Cherry and did the shadows by mixing Black cherry with some Black. I painted the buttons on the shirt black and the buttons on the cape silver just for a change of pace. Next I used Polytranspar Wet Look Gloss on the shoes (Ills. #11) and on the buttons.

For the face I decided to try something new. I began by spraying the face with Floquil white primer (Ills. #12A) then I used Liquitex Acrylic Wood Stain - Charcoal to darken all of the lines and shadows (Ills. #12B). Simply paint on the stain then wipe most of it away with a Q-Tip. The idea here is that as the paint is applied, the stain will keep the lines and shadows dark. What I was trying for with the color scheme was to create the effect of burned and healed flesh which is why I combined the basic pink flesh tone with a lot of yellow and orange. the colors referred to for the face are all Polytranspar Acrylic Airbrush Paint. Illustration #12C shows the effect of a couple coats of Whitetail Ear Medium (sort of a pinkish color). I followed thiq up with a couple of coats of Transpar Orange and more Whitetail. Next, I used some Sailfish Blue and Lavender Flesh to create some monstrous shadows around the eyes and under the cheek bones (Ills. #12E). I then applied more Whitetail to even out the highlights and some mars Red to create a shadow around the hairline. After this, I continued working shades of Whitefowl Base Yellow, Transpar Orange, Whitetail and Whitetail mixed with some Superhide White for highlights (Ills. #12G). Once completely happy with the flesh tones, I sprayed the head with Floquil Figure Flat.
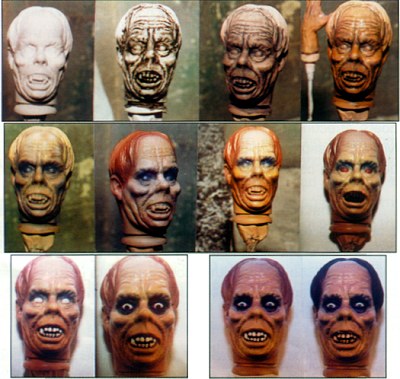
The brushed-in detail work began with Ills. #12H. Here I've covered the eyeballs with Ceramcoat Tompte Red and the teeth and gums with Ceramcoat Black Cherry. For most kits, I wouldn't have used Tompte Red for the eyes but since the Phantom is pretty monstrous looking, I figured I could get away with it. Next I used white mixed with just a small amount of charcoal for the eyeball and light ivory for the teeth (Ills. # 13A). the white on the eyeball should be applied very lightly, almost a wash, to avoid obscuring the very subtle iris molded into the eye. The shadows around the eyes were done with a mixture of Midnight Blue, Purple and Black. The first layer of the iris is black (Ills. #13B) Illustration #13C shows the completed eyes. The sequence of colors I used for the eye is as follows: outer iris black, inner iris dark turquoise with turquoise highlights on both sides and a very light turquoise to highlight the highlight and finally black for the pupil. Illustration #13D shows the almost completed face. Here I've added Liquitex Woodstain Sherry to stain the teeth, painted the hair black with some dry brushed blue highlights, and softened the shadows beneath the eyes with a flesh toned wash. Use Floquil figure flat to protect the finished paint job then gloss the teeth and eyes with Polytranspar Wet Look Gloss.
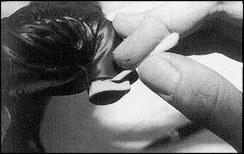
Finally, I used a Red Iron Oxide on the fingernails to create the shadows around the nails (ills. #14).
We are now ready to assemble the completed kit. Use a blow dryer to heat the pieces before assembling. The only parts I glued were the jacket to the pants and the cape to the back of the jacket. Everything else just snaps into place. You may want to do a little extra trimming to make assembly as smooth as possible, that way you won't risk hurting the paint job.
The Phantom base is pretty straight forward to build and paint, just take your time on the keys which can be extremely tedious.
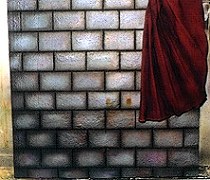
The back wall was sculpted out of balsa foam with Fleck Stone used to create the texture (Ills. #15). The wall hanging is simply a cloth napkin from Target.
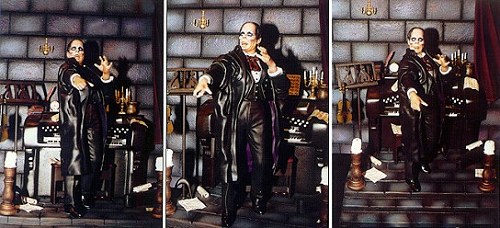
Illustrations #16, #17, #18 show the completed kit on the base with a few Doll Shop extras (like the candelabra) for realism.
See ya next time!
Originally published in
KitBuilders Magazine.
Reprinted here with permission. Thanks, KitBuilders!
The Gremlins in the Garage webzine is a production of Firefly Design. If you have any questions or comments please get in touch.
Copyright © 1994-1997 Firefly Design.