
Screamin' - Pinhead Cenobite (Hellraiser) by Ed Martinez |

| Reviewer: | Ed Martinez |
| Kit: | Screamin' - Pinhead Cenobite (Hellraiser) |
| Scale: | 1/6 |
| Material: | Vinyl |
| Parts: | 8 |
| Genre: | Horror |
| Sculptor: | Jeff Brower |
| Updated: | January 24, 1998 |
| Reviews: | Ed Martinez |
| Buildups: |
|
 his
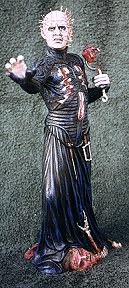
kit is over 12", tall and includes chain and cord, pins, and a resin skull, hook, and heart.
This is the third Pinhead kit released from Screamin' and it is the first one in 1/6 scale
(the first two were both 1/4 scale.). There are only five vinyl parts and a few resin
and metal accessories, so it is a very easy kit to build. It would make a good first kit
for a novice modeler. As with any vinyl kit it is always important to warm the vinyl
before cutting. I find it also helpful to take a "sharpie" marking pen and
draw a line where I want to cut. I generally start with a nice fresh sharp exacto
blade, cutting away from myself. It's very easy to slip and cut yourself if your
not careful. I cut away the majority of the plastic first then go back and slowly and
more carefully trim away the last bits of vinyl and test fit the parts. It is a good
idea to fill vinyl kit parts with something; newspaper, tinfoil, or plaster works. I chose
rigid poly urethane two-part foam. This will prevent the kit from changing shape
due to temperature and humidity changes. Gluing the arms & body together with cyanoacrylic
glue will be stronger if you pin the arms to the body first. I then primed the figure
with several light misted on coats of Floquil flat white primer. I let this dry
overnight. Be sure to wash all parts with a mild dish soap and dry thoroughly
before priming. his
kit is over 12", tall and includes chain and cord, pins, and a resin skull, hook, and heart.
This is the third Pinhead kit released from Screamin' and it is the first one in 1/6 scale
(the first two were both 1/4 scale.). There are only five vinyl parts and a few resin
and metal accessories, so it is a very easy kit to build. It would make a good first kit
for a novice modeler. As with any vinyl kit it is always important to warm the vinyl
before cutting. I find it also helpful to take a "sharpie" marking pen and
draw a line where I want to cut. I generally start with a nice fresh sharp exacto
blade, cutting away from myself. It's very easy to slip and cut yourself if your
not careful. I cut away the majority of the plastic first then go back and slowly and
more carefully trim away the last bits of vinyl and test fit the parts. It is a good
idea to fill vinyl kit parts with something; newspaper, tinfoil, or plaster works. I chose
rigid poly urethane two-part foam. This will prevent the kit from changing shape
due to temperature and humidity changes. Gluing the arms & body together with cyanoacrylic
glue will be stronger if you pin the arms to the body first. I then primed the figure
with several light misted on coats of Floquil flat white primer. I let this dry
overnight. Be sure to wash all parts with a mild dish soap and dry thoroughly
before priming.
I began by base coating the costume with flat black acrylic through my airbrush. Next, I based out the flesh with a light ivory mixed from white and tan. Next, I dry-brushed a pale blue-gray all over his costume to highlight the details. Then I painted the torture tools and hooks silver mixed with gun-metal. I then sprayed clear flat to protect what I had done so far. After that had dried thoroughly I began to apply washes to Pinhead's grid pattern of a bloody red color. I also applied washes to the wounds on the belly and chest, the hands, and the severed head at the base of his robe. Next, a mix of burgundy and road rash brown was used to shade in the major shadows of face and hands. A mixture of Horizon cbocolate brown and pink/burgundy was applied, well-thinned, with a fine point detail brush to sharpen all of the features on the face and hands. Next Polytranspar Black Umber was used for additional shading around the eyes. Finally, a blue black was dry-brushed an the eyelids and eye socket area. For the eyes themselves an off-white color was painted in first using a very small detail brush. When that had dried, large black pupils were painted in. Pinhead's eyes are almost completely black like huge dialeted pupils. Base coat the inside of the mouth black and, carefully paint in yellow/browilish teeth. Apply several coat's of clear flat to the head and face. After that has dried thoroughly (overnight), carefully insert pins after warming the head with a hairdryer. The skeletal hand intestines on the back of the robe and the severed head can now be finished. I painted the hair on the head dark brown with a black wash over that. I then based-out the intestines with a pinkish red. The skeletal hand and vertabrae were based out with a ruddy brown mixed by adding red and brown. I dry-brushed the skeletal hand with a dark bone color to pick up the highlights. I put several washes of ruddy flesh color over the severed head and the intestines and finished them with bloody washes. Finally, drill two holes into the temples of the resin skeull. With a pair of wire cutters, I snipped two pins in half. After the skull has been based out in a bone-white color, I applied washes of transparent black and brown. I glued one cut-off pin through one end of the chain provided. I put the pin through tbe chain and glued the pin into a whole in the skull. One end of the hook has a hole. Thread the chain through the hole and glue the second pin the chain into the skull. The hook and heart were painted bloody red and gloss coated several times for a wet look. The heart with hook and skull with chain were then glued into either side of Pinhead's fist. Finally some light veins were dry brushed onto the heart with ivory white. Last I cut the cord provided, drilled holes into the tool handles and the belly wound, threaded the cord tbrqugh into the shape of a "W". I painted the handles wood grain and gave the blades a black wash. This part was a bit tricky with the cord, but those of you who find this difficult can leave this part out and your kit will still look great. The tricky part is you must cut the cord into four individual lengbhs and poke the ends through the holes in the handles. Put a drop of glue on it to keep it there, anchoring the other end to the wounds on the stomach. The center point of the W is the belly wound. The artist sculpted in only two torture tools and Pinhead is usually seen with a total of four tools hanging from his waist. Also you must provide 2 small fishhooks to coplete a detail on the back of his head. These are the only items missing and can easily be provided by the builder. In closing, I think this is the best most accurate Pinhead so far. I like the scale and the corpse/victim stuff on the bottom of the skirt for a mice change of pace. You can work wonders with this kit when you give it a really good paint job. I hope Screamin' will continue to produce the other Cenobites in this scale. That would make some wonderful dioramas for all of you brethren of the Order of the Gash. It would also be nice to see some diorama bases and accessoeries torture pillars, victims, etc.). As usual, sculptor Jeff Brower has surpassed himself again (I'm looking forward to his Xena figure next). Each piece is better than the last. |
|
The Gremlins in the Garage webzine is a production of
Firefly Design. If you have any questions or comments please
get in touch.
Copyright © 1994-1999 Firefly Design. |